
Yield : 9 buns in 18cm square pan
Ingredients
150g whole milk 全脂牛奶20g condensed milk 炼乳
3/4 tsp instant dry yeast 即发干酵母
225g bread flour 高筋面粉
25g top/cake flour 低筋面粉
40g fine sugar 细糖
25g beaten egg 蛋液
1/4 tsp salt 盐
30g unsalted butter 无盐奶油
Some flour for sprinkling on bread top
些许面粉撒做表面装饰
Direction
For using bread maker, please refer to the steps at the end of this recipe ^^
1. If you are using cold milk, keep warm the fresh milk, and condensed milk in a rice cooker for 10 minutes.
Or, you can let them stand in room temperature for about 25 minutes.
The temperature should not exceed 38 degree Celsius in order not to affect the yeast.


2. When the milk mixture temperature has reached between 28 to 38 degree Celsius, sprinkle dry yeast over the surface without stirring it. Cover with a lid and let it stands for about 15 minutes to activate the yeast.


3. Pour all the dry ingredients into a mixing bowl, except the butter. Mix well.

4. Pour in the yeast-milk mixture from (2), and beaten egg. Stir in one direction to mix the ingredients into a lump which pulls away from the wall.


5. Cover the dough with a lid and let the dough rest for 15 to 20 minutes. This allows the flour to absorb the liquid which would make kneading easier later.

6. Wear a pair of CPE gloves to handle the sticky dough. Start kneading the dough by slamming, pulling and folding, for about 10 minutes, or till the dough become smooth and elastic.
The stickiness would reduce after about 1 to 2 minutes into kneading.
Slam and pull;


7. Spread out the dough and apply softened butter to the dough.

8. After incorporating the butter to the dough, grab one end of the dough and slam it against the work top. Fold in, grab the adjacent end and repeat the process. Knead well for another 10 to 15 minutes till the dough can be stretched into a membrane.


9. Pull down the side of the dough and tuck in at the bottom. Store the dough in a clean mixing bowl lightly oiled. Spray some water and cover with a lid. Allow the dough to proof for about 1 hour, or till it doubles in size.

10. While waiting for the dough to proof, apply a thin coat of butter and line a 18cm square tin with parchment paper. The parchment paper serves to help to lift the bread out of the tin after baking.

11. After the dough has double in size, sprinkle some flour over, and transfer it to the work top. Press down to release the trapped air.


12. Divide the dough into 9 equal portions. You

13. Roll up the individual doughs and shape into balls by pulling down the side of the dough, and seal at the bottom.

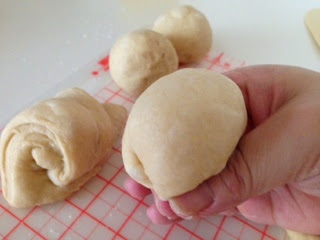
14. Coat the dough ball with some flour and roll it within your hand into a round ball. Place into the lined baking tin.


15. Spray some water and let the dough proof in a closed oven for about 40 minutes, or when the dough almost reached the brim.


16. Remove the dough from the oven. Start to preheat the oven to 180 degree Celsius.
17. Use a sieve to sprinkle some flour over the top of the dough.

18. When the dough is in the oven, lower the temperature to 160 degree and bake for 10 minutes; further reduce the temperature to 150 degree Celsius and bake for 10 to 12 minutes, or till the top slightly brown.


19. Transfer the bread out of the oven and lift out from the tin onto a cooling rack Immediately.


Give the bun a deep slit and spread butter to enjoy :)


23 Jan 2017 bake
I scribbled a few auspicious chinese characters <福> to the crusts of the buns just to add some lunar new year mood to the buns. However, these characters were like rainbow - they gradually diminished after a few hours out of the oven :(
In case you are interested to know how I did it, I just share the simple steps here.
i) sprinkle bread flour over the buns just before baking.
ii) use a metal chopstick to scribble the Chinese character, and at the same time, "sweep away" the flour lying on the path of the Chinese characters.
iii) dip the tip of the chopstick to a little golden syrup or honey, slowly "paint" out the chinese characters using the syrup.
iv) bake as above instructed ;)


For using Mayer bread maker MMBM12
There are slight differences in the sequence of the ingredients being added as compared to hand-kneading.
Ingredients
150g cold whole milk 冷全脂牛奶
20g cold condensed milk 冷炼乳
40g fine sugar 细糖
25g beaten egg 蛋液
1/4 tsp salt 盐
225g bread flour 高筋面粉
25g top/cake flour 低筋面粉
3/4 tsp instant dry yeast 即发干酵母
30g cold unsalted butter 冷无盐奶油
150g cold whole milk 冷全脂牛奶
20g cold condensed milk 冷炼乳
40g fine sugar 细糖
25g beaten egg 蛋液
1/4 tsp salt 盐
225g bread flour 高筋面粉
25g top/cake flour 低筋面粉
3/4 tsp instant dry yeast 即发干酵母
30g cold unsalted butter 冷无盐奶油
Some flour for sprinkling on bread top
些许面粉撒做表面装饰
Direction
1. Add ingredients, starting from cold whole milk to instant dry yeast, into the bread pan first.

2. Select "C-11 Ferment Dough" function, and start the program.
The program, which consists of mixing, kneading and 1st proofing, will take 1 hour 30 minutes to complete.

3. When the bread maker countdown timer reads "1:20", dispense cold unsalted butter into the pan.
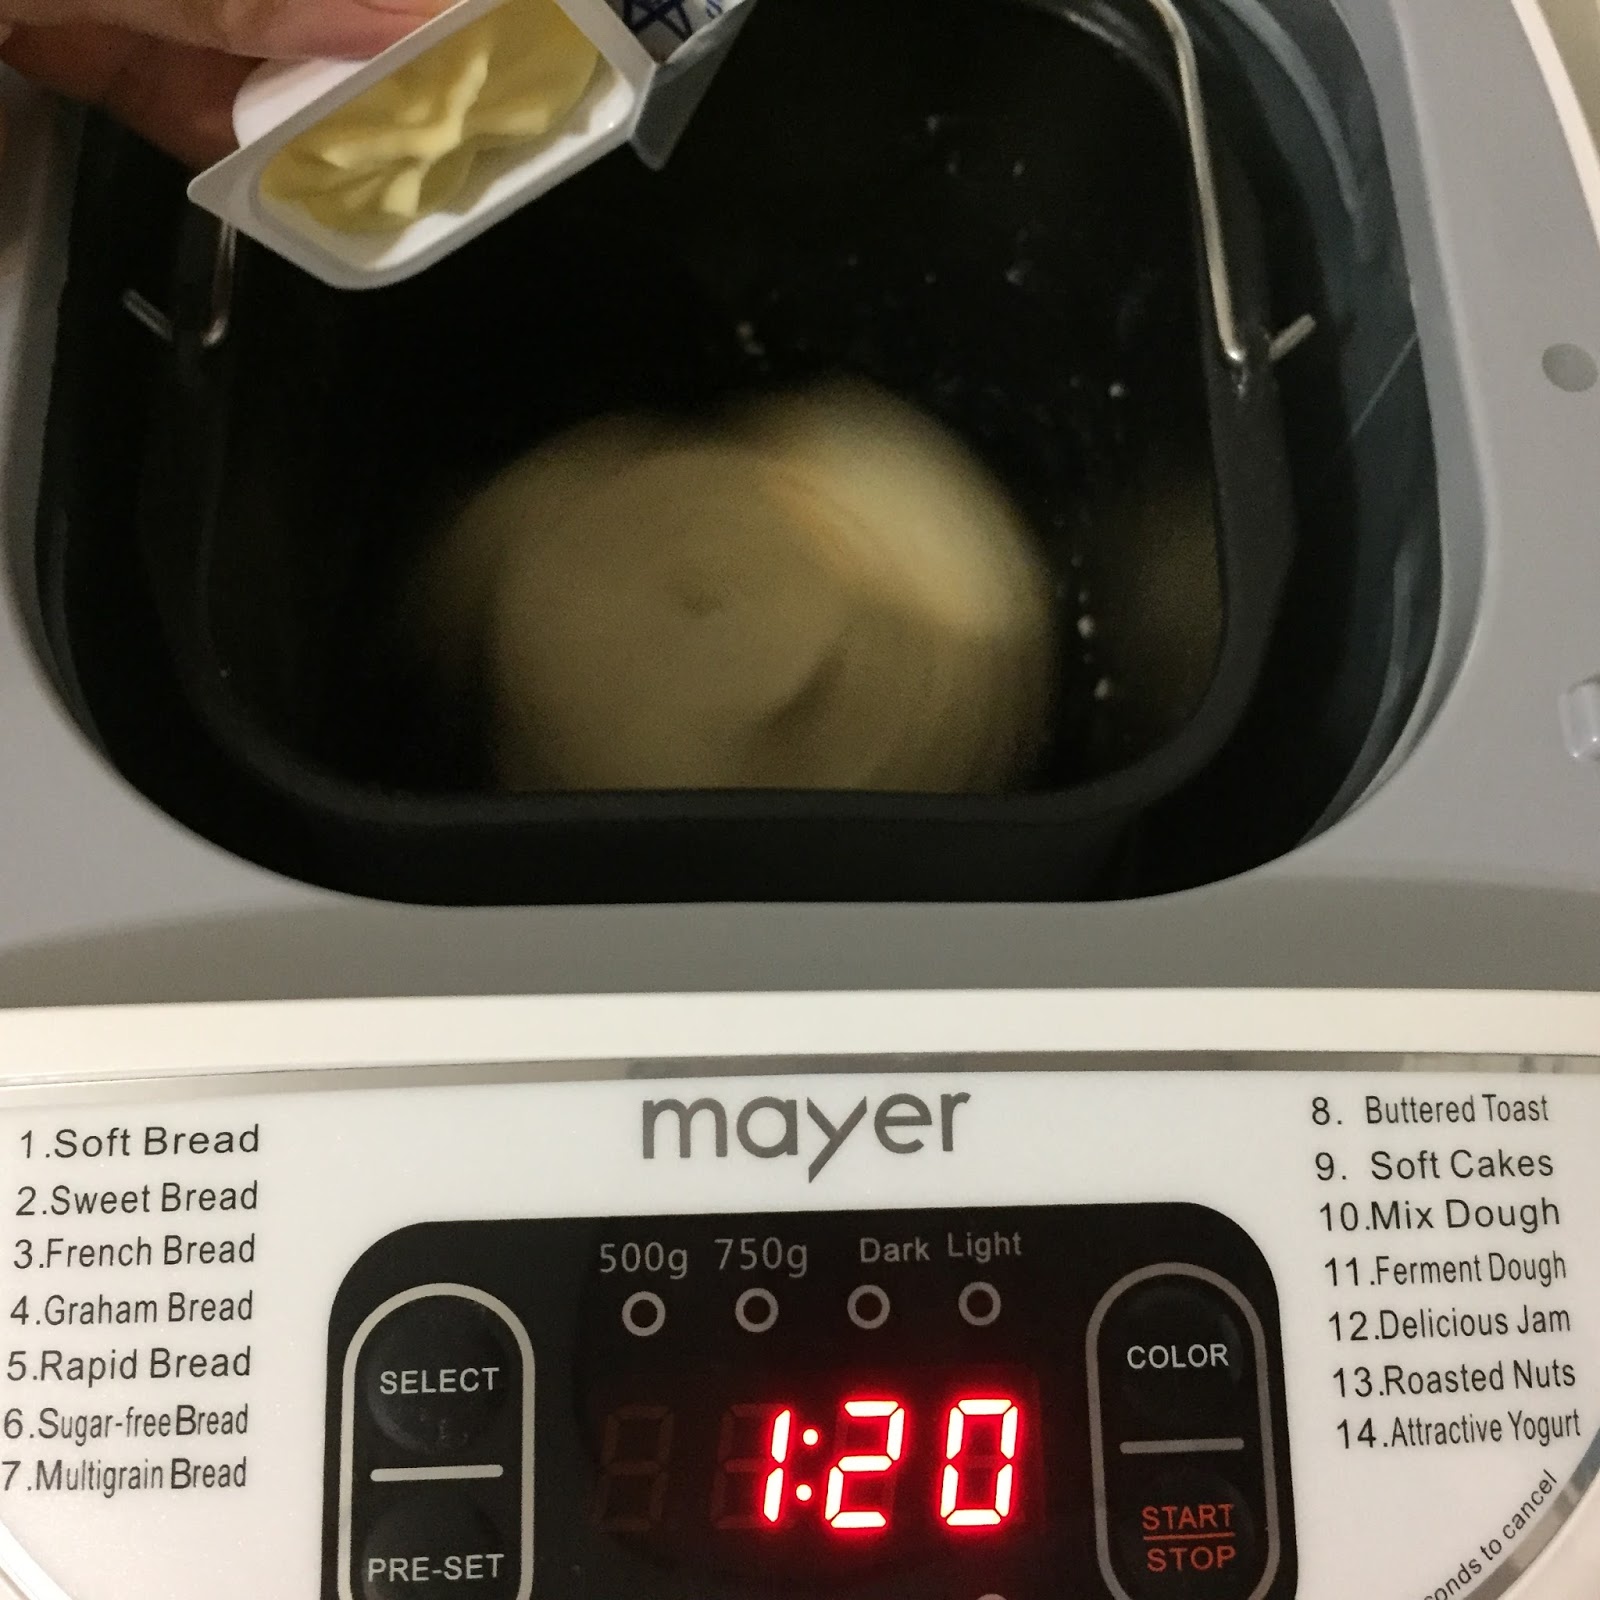
4. When the program ends, let the dough sits in the bread maker for another 30 minutes.
At the end of the "Ferment Dough" program.

At the end of the additional 30-minute rest.

Follow the shaping steps starting from Step 10.
They look just great! I have to try these milk buns during the weekend.
ReplyDeleteHope you'll like it :) Happy Baking ^^
Deletehi
ReplyDelete1) can i know what is the preheat timing for the 180degree?
2) what is the flour used for spinkling on the bun since there are 2 types of flour in your ingredients?
Hi Jesline, usually the oven takes about 10 minutes to heat up. You can use the leftover bread flour you use to sprinkle on the dough and worktop during kneading :)
ReplyDeleteIt is possible to substitute the condensed milk with something else?
ReplyDeleteHi Shi En, you can substitute it by 10g milk and 10g sugar :)
DeleteBaking in oven...now see again. ..i forget spray water��. Hopefully will turns out find.
ReplyDeleteThanks it turns out well...love it
ReplyDeleteHappy to hear this :)
DeleteHi is there any replacement for eggs?
ReplyDeleteHi Santhy, you can replace the egg by 20g of milk :)
DeleteMay i ask why my bread always stick on the paper after bake?
ReplyDeleteHi Chris, if you use the non-stick parchment paper, like Glad brand, you shouldn't have this problem. Otherwise, you may have to apply some oiler butter on the surface before resting the dough ;)
DeleteMay I ask where can I get the gloves?
ReplyDeleteHi Cathy, I bought the pair of silicon gloves through Qoo10. Just key in "Sillymann" to search for it. The delivery is from Korea :)
DeleteThey don't sell it anymore. The normal plastic glove is very flimsy and cannot do a good job. I read that we can oil our hand to handle sticky dough. Can we use oil? Will it change the bread texture?
DeleteOk thanks..
ReplyDeleteMay I ask where to buy the plastic cover for the stainless steel bowl
ReplyDeleteHi Shirley, I bought the microwaveable cover from Daiso :)
DeleteHi Ngaileng, may i ask if i can leave the dough overnight after the last step and bake it in the morning instead?
ReplyDeleteHi Carrin, I'm not too sure whether your dough can keep its shape till the next morning. Maybe you can reduce the yeast quantity to 1/2 tsp, so the dough would not rise too fast in the fridge. Keep your dough in a double layers plastic bag, so the fridge would not siphon away the moisture in your dough and make it dry :)
DeleteHi
ReplyDeletethanks for the recipe! Any problem if I replace the condense milk with evaporated milk ?
Hi, maybe you can replace the condensed milk by 10g sugar and 10g evaporated or fresh milk :)
DeleteThanks deary.
ReplyDeleteWhy my dough still sticky even though i have knead longer?
ReplyDeleteHi, it may due to measurement error, you can overcome by adding small amount of bread flour to try. If you wear a pair of disposable gloves, this problem can be overcome too. This is a rather sticky dough, once your hands are stuck with the dough, the sticky problem will continue until you handle the dough with a clean pair of hands coated with flour :)
DeleteHi! your milk buns really look good and soft. can't wait any longer I must give it a try. Thanks for sharing.
ReplyDeleteThank you Veronica for your sweet comment. Hope you'll like the recipe. Happy baking :)
DeleteLove ya answers and indeed has taught us new ways and method to overcome baking issues...
ReplyDeleteLove your nice comment :)
DeleteBaking in the oven, I read wrongly, after spraying water, I straight away sprinkle the flour to the top:S
ReplyDeleteHaha, Jeannie, that's okay, it won't affect your delicious buns ;)
DeleteHI,
ReplyDelete1st time visit your blog while surfing around.
Just a curious query about the yeast, still quite new to bread making. Stated its dry yeast but from the picture, noticed that its instant yeast. I have thought proofing is not required for Instant yeast, thus, is there any reason why you had do yeast proofing in liquid like active dry yeast?
Thanks
Hi
ReplyDeleteFor your milk buns can I use BM do d kneading n then make into buns with any fillings?
Hi Sing Yee Fong, yes you can use BM to help you knead the dough then shape according to your need :)
DeleteUsing d BM do I need to knead d dough once or twice?
DeleteYou only need to select the "Dough" function, and the BM will do the kneading and 1st proofing for you :)
DeleteThank for sharing
DeleteTumpang post ya.. can I use the BM to bake it as a loaf? Thanks!
DeleteLove your blog. Will try for this christmas :)
ReplyDeleteThank you for visiting my blog. Hope you'll like the recipes :)
DeleteHi will like to check can i use bread machine n do I have to alter the measurement and how? Thank you
ReplyDeleteHi Eileen, you can use this recipe in BM. For procedure you can refer to my another recipe
Deletehttp://mymindpatch.blogspot.com/2014/11/ham-cheese-bun-breadmaker-kneaded.html
Oh wow! Thank you very very much!
ReplyDeleteHi i baked already.... is very soft n nice but i feel not enough of the condensed milk, can i add more?
ReplyDeleteHaha, Eileen, I've never try adding more condensed milk. It may make the dough too sticky and make it dense. But if you increase the condensed milk proportion, you may have to reduce the fresh milk and sugar content :)
DeleteBest evarr sweet milk bun!!! Thank you very much for sharing the recipe and step by step tutorial here make life easier for a novice baker like me. I have tried few of the recipes here so far so good never failed! :0 U have a great talent, my day is never complete without going to ur blog. Thanks again God Bless you and family :)
ReplyDeleteHi!
ReplyDeleteYour Sweet Milk Buns look so soft and fluffy. Gonna add this into my to-try recipes list. =D
Hi!
ReplyDeleteI just tried the recipe. The buns turned out soft and fluffy but tad bit too sweet. Gonna reduce the sugar amount next time.
I did not manage to divide the dough equally and I got 10 rounds instead of 9. I accidentally sifted too much flour on top of the buns.
But all in all, it was a good recipe. Thanks!
Thank you for sharing your baking experience with me :)
DeleteHi for this recipe can i make into one loaf instead of buns ?
ReplyDeleteHi Sing Yee Fong, yes you can bake this recipe into a loaf :)
DeleteTq
DeleteHi, Thanks to your receipe.. i finally have nice soft bread. And my girl love them. But the bread colour not like yours. Can i chk:
ReplyDelete1) do u take the bread out to turn side after baking halfway thru?
2) do you use only upper heat or both lower/upper hear during bake? I find mine is too hot and can only bake for 10mins if i follow ur temp.
Thanks
Hi Flobber, sorry for my late reply. I'm happy to learn that your family likes the bread.
Delete1) I didnt rotate the tray while baking;
2) i use both upper and lower heat. There is slight variation in temperature control for different oven. So you'll have to adjust the temperature according to your oven:)
I see.. Thanks thanks :)
DeleteCan I bake these in paper cups? thx
ReplyDeleteHi Afkar, yes you can bake the bread in paper cups. You would have to adjust the size accordingly :)
DeleteHi, can I check with you if we use bm to knead, do we just add all the wet ingredients then dry, with yeast on top? Or do we need to follow the steps and only start using bm when the kneading steps start? thanks.
ReplyDeleteHi Jete, you follow the BM operating procedure, wet ingredients, follows by dry ingredients, and the yeast on top. Happy baking :)
ReplyDeleteHi, tried it and it's nice and soft. Love it. Thanks for a great recipe! :)
DeleteThank you for your nice feedback :)
DeleteHi, this is my kids' fav recipe! They would love this in chocolate flavor with chocolate chips. Any suggestion on how to modify this recipe to achieve that! Thanks.
DeleteHi Jete, happy to know that your family enjoys the bread made from this recipe. You may want to try this recipe for the chocolate version :)
Deletehttp://mymindpatch.blogspot.com/2015/05/choco-milk-bun.html
Looks yummy! Will try it soon. Thanks!
DeleteLove this recipe! Thanks for sharing 😉
ReplyDeleteHi Diana, happy to receive your positive feedback :)
DeleteMy family love this bread :) but am i able to substitute the bread flour with wholemeal flour? What will the quantities be if only partial wholemeal flour?
ReplyDeleteHi Michelle, happy to see your nice feedback ^^ If you want to maintain the softness of the bread, you can substitute the cake flour by wholemeal flour. A higher quantity of wholemeal flour will result in a denser and compact texture :)
DeleteHi Ngai Leng, I did my first attempt of your recipe and my friends love it so much! Thanks for sharing!!
ReplyDeleteThank you Sharon for sharing your baking joy with me. Happy Lunar New Year to you :)
DeleteHi thanks I live ur recipes &this one is gorgeous. I am gonna try this one &see how it turns out. Thanks for sharing I read all the questions &ur recipes to them they r very helpful &surely I will get all the benefits. Thanks a lot.
ReplyDeleteHi Janee, thank you for leaving this nice message. Hope you'll like the recipe and Happy baking :)
DeleteI baked it and turn out very well. Thanks for sharing
ReplyDeleteHi KirenKitchen, thank you for sharing your experience with me. Happy baking :)
DeleteThanks so much for sharing! Finally tried it and loving it so much!
ReplyDeleteThank you and glad to receive your nice comment :)
DeleteThis is my favourite bread recipe and I always recommend this recipe to my friend. Thank you so much for sharing!
ReplyDeleteHi Diana, love your comment <3 Thank you for liking the recipe and recommend it to your friends. Happy baking :)
DeleteNice post…. I enjoyed reading your informative article and considering the points
ReplyDeleteBread Paneer Rolls
Thank you Sony :)
DeleteHi NgaiLeng , can I use this bun recipe as a base for all my assorted buns ?
ReplyDeleteYes, you can treat this recipe as the basic sweet dough for other bread toppings or fillings :)
DeleteTks NgaiLeng
DeleteHappy baking ;)
DeleteHi, I have enjoyed reading your blog! And you seems to make baking bread an easy task. But when I tried this recipe, my buns turn chewy and feel a little sticky. May I know what went wrong? I am using bread maker to knead for 40mins and proof outside the maker. Then I use oven to bake. I am getting discouraged in baking bread. Hope you could enlighten me. TIA!
ReplyDeleteHi Jerin, thank you for liking my blog. My BM only knead the dough for about 20 minutes and proof for 80 minutes. 40 minutes kneading seems a bit long for me.
DeleteIf your bun tasted sticky and chewy, probably the proofing was not thorough. To test whether your proofing is enough, at the end of the proofing, lightly press the dough, the surface should be able to bounce back, or else continue to proof. Hope this info help :)
Hi hi, how is this recipe different from the famous Hokkaido milk bread? Other than I use the real Hokkaido milk from ntuc finest? Thanks
ReplyDeleteHi Gillian, I think the main differences are this recipe is sweeter and doesn't need whipping cream :)
Deletehi I making milk bun now and totally forgot abut the condensed milk to add with fresh milk and then yeast, how arh? I am proofing the yeast-milk now
ReplyDeleteHi Celine, so sorry for the late response. As the condensed milk only stands a small proportion in the recipe, it would not affect the overall texture of the bread. Hope your bread turned out good :)
DeleteHi,
ReplyDeleteMay I know what is the purpose of using cake flour?
Thank you very much.
Love your blog :)
Hi Stella, the cake flour will give the bread a softer texture as compared to using pure bread flour :)
Deletethank you :)
DeleteGlad to share with you:)
DeleteHi, wanna ask if I wan to use BM to bake this bread.. Which function should I use?
ReplyDeleteHi, you can choose "sweet bread" function which has a process of about 2 hours 40 minutes from mixing to baking :)
DeleteHi! What oven are you using? Any recommended oven for beginner for home baking?
ReplyDeleteHi Jerlynn, I'm using a Teka brand built-in oven. Usually a bigger oven will have a more steady temperature control. You need to chech the size of the available space in your kitchen to find a suitable oven :)
DeleteHi!
ReplyDeleteMy Friend reccomended me your recipe and I'm so excited to try it out! Before that, I would like to know if used dry active yeast or instant yeast? I read somewhere that it makes a difference.
Can I substitute whole milk with Low fat milk? Will it make a difference?
Lastly, when we mix the softened butter in the mixture, do we do it at one go or mix it in over a few rounds?
Thanks for the awesome blog and appreciate your reply! :)
SG
Hi Steph, I've been using instant dry yeast for all my bread dough. According to an article I've read, active and instant yeast mainly differ in size, with former being granules and the latter in powder form. Active dry yeast needs to be activated in water, while instant dry yeast an be added directly to the bread dough.
DeleteYes, you can use low fat milk to substitute fresh milk. The bread will have a nicer aroma and softer texture for using fresh milk in the dough. But I think the difference may not be wide.
I add the softened butter at one go.
Hope I've answer your questions and you'll like the recipe :)
Hi Ngaileng,
DeleteMany thanks for your reply! Will try out the recipe these 2 days. Thank you thank you!!! :)
SG
Happy baking :)
DeleteHi, the recipe is great. I have difficulty kneading the dough though cos it took me more than 1 hour to knead it before it's not sticky. Even so, it's not as smooth as yours. Do you have any tips? Thanks much!
ReplyDeleteHi, wow, 1 hour of kneading was too long. Maybe you can leave the dough for about 20 to 30 minutes for it to autolyse. Autolyse is the self connection of the gluten without kneading. Usually, after about 1/2 an hour of rest, the dough would not be so sticky and easier to knead. Or you ca reduce the milk by 10g to make the dough less sticky.
DeleteUsually the interior of the dough is more sticky than the exterior, so try not to mess up the dough. If your hands are sticky, try to clean your hands before touching the dough further, as the stickiness will make kneading difficult. I prefer to wear a pair of mat surface gloves to handle the dough, especially at the beginning of the kneading process.
Hope these tips help :)
Hi Ngai Leng, thanks for your detailed reply. Should the autolyse part come after step 5 of the above recipe? Thanks very much.
DeleteHi Ngai Leng
ReplyDeleteMay I know if u can add Nuts or cranberries into the recipe?
I m using BM and had asked into loaf. Just thinking of adding nuts or cranberries.
Hi Roselene, yes, you can add nuts and dried cranberries to the dough 😄
DeleteThanks Ngai Leng. At which stage during the bread machine current do I add the cranberries?.
ReplyDeleteI have also baked the blueberries loaf and is very nice. Kids consumed all within hours. Thanks for the recipe. Will it take good also if cranberries is added? Do I need to alter the ingredient? How much cranberries to add? Sorry for so many questions.
Hi Roselene, thank you for liking my recipe. For this recipe, you can add about 20g of dried cranberries during the 8th to 10th minutes of the BM kneading time. Cut the dried cranberries into bit size before adding in 😄
DeleteThanks Ngai Leng
DeleteHello, can you please give cup measures ? I don't have a kitchen scale. Also can I substitute bread flour with AP flour? Tnx
ReplyDeleteHi Amirah, sorry I'm not familiar with using cup measurement, so can't give a fair advice. Maybe you can try those conversion table to give you the measurements in cups.
DeleteYes, you can use all purpose flour instead of bread flour :)
Hi Ngai Leng, can the dough be mixed using a mixer instead of hand knead?
ReplyDeleteHi Teng, yes, you can use a mixer fixed with dough hook to knead. Nowadays I use bread maker to knead the dough too :)
ReplyDeleteCan I know what's the pan size you used? Will it affect the final results if I used a pan size that's too big/small?
ReplyDeleteHi Teng, my pan size used was 20cm square pan. Yes, pan size bigger or smaller may affect the look of the bread :)
DeleteHi Ngai Leng, I love your recipes very much and been baking in NZ however I find that all my bread tends to be harder after several hours or the next day. We have dry & colder weather here is that y it affects the softness of my bread? Any method to improve??
ReplyDeleteHi JS, happy to learn that you love my recipes 😊 I believe your cold and dry weather do have some impact on your baked bread. It's like keeping bread in the fridge. The only way to restore the softness of your bread is to spray some water over the bread and heat it in an oven or toaster before serving. I usually would heat up at 80 to 90 degree Celsius for about 10 minutes. Hope this info helps:)
DeleteHi I'm impressed by how much trouble you take to answer everyone's questions. Thank you. Excited to try your recipe. Cheers
ReplyDeleteHi wblian, happy to receive your appreciation 😊 Hope you'll like the recipes 💕
DeleteHi, I love to read your recipe. I'm going to try some of it. about the kneading part, how if i use kitchen machine?
ReplyDeleteHi Lidya, thank you for your interest in my recipes 😊💕 I'm so sorry I'm not familiar with the use of a kitchen machine. Maybe you can watch some YouTube videos on demonstrating the operation of the machine 😉
DeleteHi Lidya
DeleteI've manage to tweak the recipe to a stand mixer and the buns came out the lightest of all the bread I've baked. Mail me if you still need the recipe.
I'm a little late in reply. Tweak the recipe a bit with tanzhong and in a stand mixer. 10 minutes before butter and another 15 mins after adding the butter. Didnt have the time to. Poof it it but so I chuck it in the fridge till the next day. Took it out of the fridge the next morning and let it poofed for an hour before I shaped the buns which I had later allowed it to poof in the baking tray for another hour or a little more. Bake it at 160 degree celcius for 10 mins, glazed it with whipping cream and back in the oven for another 10 minutes at 150 celcius. Buns came put perfect. Softest buns I have ever baked!
ReplyDeleteThank you Yihui for sharing with us 💕😊
Deletehai Goh Ngail Leng,
ReplyDeleteI would like to inform you that I have used ur pictures to get a pane window in your blog in my instagram.thank you.I hope you give permission to share knowledge. thank you.
Superb work, I tried making it by using Nandani Fresh milk and condensed milk. The burn turned out to be very delicious. Thanks sharing such Amazing recipe.
ReplyDeletehi, thank you for giving me your good feedback 💕💕😊
DeleteHi, can I check for the BM recipe. Can we put butter at the start together with liquids in state of it being knead for 10mins then release the butter into dough? Mine it’s a different BM ...
ReplyDeleteHi, can we put butter together with liquids right at the beginning in state of releasing it after 10mins of kneading?
ReplyDeleteHi Doris,
DeleteYes, you can add the butter together with the rest of the ingredients if you’re using a bread maker :)
May i know what's the purpose of dusting bread flour before baking?
ReplyDeleteHi Goh,
ReplyDeleteMay I know why is it when hand knead we have to use warm milk but machine knead we can use cold milk. Thanks :-))
Looking great work dear, I really appreciated to you on this quality work. Nice post!! these tips may help me for future.
ReplyDeleteTake a look a this link too Click speed Test
To write a beautiful post it is very important to write a beautiful container and you have created a very nice design and I got a lot of inspiration from your post and I also want to have nice and beautiful post like you in my life. golden opportunity
ReplyDeletecollege girls in gurugram
Butey girl agency
vip girl gurgaon
gurugram girl photos
gurugram girl number
girl number whatsapp Gurugram
gurugram girl contact number
Nuru Massage Gurgaon
Lose 20 Pounds Wight