
Bread baked with the addition of poolish dough using natural yeast has a nicer aroma, finer and more springy texture, as well as having a more moist crumb. The softness of the bread can last till the 4th day.
This is a sharing of my more successful experience in cultivating natural yeast for baking use. I have failed thrice using just water and flour. My previous cultivation though successfully allowed me to bake a nice loaf of bread, I think I have over extended the cultivating period. Unless you have seen the entire phrase of the cultivation, you could not judge when is the right time to transfer or "harvest" the yeast.
With the detailed documentation, hope it would helps new natural yeast "farmers" like me to have a better picture of the entire process. This is not a guide book, just an experience sharing.
Good luck 👍🏼🍀
Getting started...
Equipment & Ingredients
1 glass bottle with lid, about 600~800ml
200g fresh grapes
200g cool boiled water
50g raw/fine sugar
Directions
1. Rinse the bottle with boiling water to sterilize it. Allow to dry before use.
I kept it in a warm oven.

2. Rinse and drain the grapes. Slice the grapes into halves.


3. Place all the ingredients into the cool sterilized bottle, and cover with a lid.
Avoid over-tightening the lid, just loosely close, so pressure would not build up in the bottle.


4. Swirl the ingredients a few rounds to mix the ingredients.
Open the lid once every day and give the ingredients about 2 to 3 swirlings each day. So oxygen can circulate in the liquid.

5. Label date on the bottle for record purpose. Keep the bottle in a cool place. See you the next day 🌻


Day 2 (1.12.2015)
Temperature: 27 degree Celsius
Feeding: no
Observation: a little bubbles can be seen.

Day 3 (2.12.2015)
Temperature: 27 degree Celsius
Feeding: no
Observation: a lot more bubbles can be seen. A faint alcohol smell can be detected.

After swirling, more bubbles have been released.

Day 4 (3.12.2015)
Temperature: 27 degree Celsius
Feeding: no
Observation: Bubbles have reduced drastically. Time to transfer.


There are more bubbles after swirling. It looks and smell like beer 😄

Poolish Starter
Addition:
100g natural yeast water
100g unbleached bread flour
Directions
1. Filter out the grapes and transfer the yeast water to a glass jug.


2. Pour 100g of yeast water to a cool sterilized bottle.

Pour 100g unbleached bread flour into the bottle.

Stir to mix.

3. Loosely cover with a lid. Mark the level of the poolish starter with a rubber band. Label the date and time for monitoring purpose. See you later.


Storage - yeast water
For the remaining natural yeast water, seal in a sterilized bottle, label with a date, and keep in refrigeration.

Label the natural yeast with a date sticker.

Refrigerate it. The references I have read indicated the yeast water can last about a week or more in refrigeration.

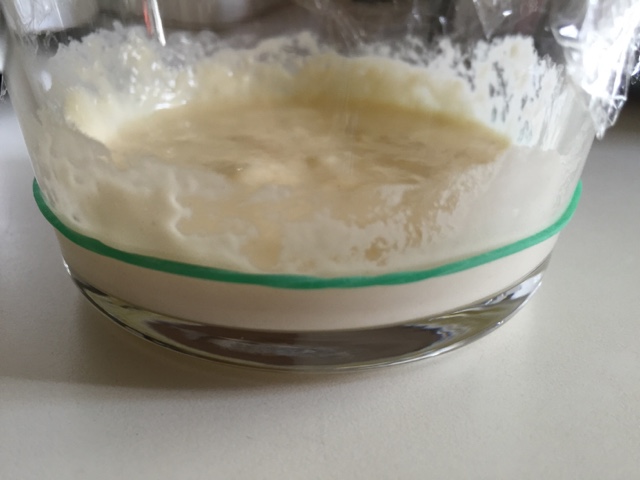
Poolish Pre-ferment
Continue with the poolish starter from above.
Day 1 ( 3.12.2015)
Temperature: 27 degree Celsius
Feeding: no
Observation: the poolish dough raise to about 4 times the original height. The natural yeast is very active.
Beginning

1 hour 20 minutes later, the volume has almost double.

2 hours 20 minutes later, the volume has increased more than double.

The poolish dough almost filled the bottle up to the rim by end of 3-hour fermentation period. The yeast is very active and is ready to join the baking ^^

4 hours later, the poolish dough starts to reduce in volume slightly.

As I would only bake in the next day, so 8 hours after the fermentation started, I kept the poolish dough in the fridge till 1am. I took out the poolish dough before I went to sleep, to let it return to room temperature. So I could activate the natural yeast when I woke up the next day.

Day 2 ( 4.12.2015)
Temperature: 28 degree Celsius
Feeding: 10g water & 10g bread flour
Observation: the poolish dough double after feeding within 2 hours. It is active and suitable for baking.
The poolish dough before feeding.

After the feeding, close the lid, mark the dough height with a rubber band, and label the time.

After 1 hour, the dough raise to about 1/2 the original height.

The dough raised to about double the original height after 2 hours.


110g of the poolish dough was harvested and use in baking of soft white bread.

Click the link to the soft white bread recipe:
Storage - poolish dough
For the remaining poolish dough, if you want to bake in the next day, add an equal weight of water and flour to the poolish dough, to start another round of cultivation.
If you have no plan to bake in the next two day, you can keep in a clean and sterilized container. Mark the date and refrigerate it.


Restoring the natural yeast
To re-activate the sleeping yeast from "hibernation".
1. Allow the cold poolish dough to return to room temperature.

2. Add an equal amount of water and bread flour to the poolish dough. For example, 20g poolish dough/natural yeast + 100g cool boiled water + 100g unbleached bread flour.
Below demostrstion only used a small amount of water and flour to reactivate the natural yeast, is for testing purpose only.


1 hour after feeding, the volume has double. Therefore, the natural yeast is healthy and active to be engaged in the baking *\(^o^)/*

Restoring long inactive natural yeast
If the natural yeast has been kept inactive in the fridge for over 2 weeks, a film of yellowish liquid will develop at the top layer.
You will have to discard the yellow liquid and only keep part of the old natural yeast, then start a new batch.
Direction
1. Allow the cold natural yeast to return to room temperature.

2. If the natural yeast has been inactive for too long, a layer of yellowish liquid will form at the top. Pour away this liquid before feeding your natural yeast.


3. Collect about 20g of the old natural yeast, and transfer to a new sterilized container.


4. Add an equal amount of water and bread flour to the natural yeast. For example, 20g natural yeast + 20g cool boiled water + 20g unbleached bread flour.


Stir, cover and mark by a rubber band.

Label and wait for the natural yeast to double in volume....

After 2 hours, the natural yeast only climbed to about 1/4 of the expected height. The rate was slow at room temperature of 29 degree Celsius (ー ー;)

*\(^o^)/*

At this slower than usual fermentation rate, it is best not to use the natural yeast, but give it a few more days of feedings, till the rate returns to normal - double within an hour.
On my second feeding on the third day, the natural yeast has regained its strength and double within an hour
*\(^o^)/*
The natural yeast is ready to work again :)

Topping up with yeast water
While feeding the natural yeast, you can use the yeast water you have stored in the fridge instead of using plain water. This helps to inject the nice flavour of the grape, which gradually diminished after a few feedings by water, back to the yeast.
Before adding the yeast water, swirl the bottle a few rounds. If the yeast water becomes foamy, it is a good sign that the yeast is healthy. If the yeast is lifeless, it's about time to let it go and keep a new batch.

I replace half of the feeding water by the yeast water.
For example,
Natural yeast poolish dough: 100g
Yeast water : 10g
Cool boiled water. : 10g
Unbleached bread flour. : 20g
Total : 140g


add in 10g of yeast water, 10g of cool boiled water, and 20g of unbleached bread flour,

Stir to mix into a smooth paste.


Cover with food wrap and a lid. Mark the new natural yeast height with a rubber band. Wait for the natural yeast to raise to double this height. It only took 1 hour to reach the new height.

It's useful to keep a record of the feeding quantity, date and time in a small post-it-note. So you'll have an idea of the quantity of the content, as well as the "production date".

Keep the new lot of natural yeast in the fridge, if you want to stop baking for more than 2 days.
Otherwise, you can keep it in room temperature, and do the daily feeding.

Renewing Natural Yeast
A bottle of natural yeast which has been fed several rounds may become increasingly sour. This will cause your bread to become sour too. When the sourness of the natural yeast is getting too high, the yeast will become less active despite your regular feeding.
To overcome this, you'll have to discard part of the natural yeast, and keep a small portion to re-cultivate it into a new batch.
For example,
Keep 20g of the old batch of natural yeast and discard the rest.
Then add 10g each of water and bread flour to form a new batch of 40g of natural yeast.

Let the natural yeast to double itself to check the activeness of the new batch.
Keep the natural yeast in room temperature if you're going to bake in the next day to two. Or else, keep it in the fridge.

Happy farming :)
Reference :
and

with appreciation :)
excellent tutorial, thanks
ReplyDeleteHi Carola, thank you for your nice comment :)
DeleteHello hi!wow wonderful!beautiful tutorial make very easy to understand&follow.thanks a lot.
ReplyDeleteI would like to ask one question.
can we use beer non alcoholic in place of making this liquid.
Hi Janee, happy to know you find the topic useful :) I'm not sure about using beer to cultivate natural yeast. I read an article which mentioned the bottled condition of the beer may not be suitable for the yeast to strive well. So, you may not get a good yeast out of beer. However, no harm trying if you have beer around :)
DeleteHi, that is a very detailed and clear instruction guide! Thanks for putting in the effort to do this! May I know if any type of grapes is ok to use? Normal brown sugar or castor sugar is fine to use? Thank you!
ReplyDeleteThank you Ping for your positive feedback ^^
DeleteYes, you can use any grapes which are fresh. You can use any sugar which has not been bleached of good minerals :)
Thank you! I have tried before with similar recipe but seem to grow mould... Will attempt again with your guide!
ReplyDeleteGlad to share with you ^^ To prevent introducing foreign mould to the natural yeast, all the equipment must be well sterilized and dried. This include the stirrer you use to stir the natural yeast. Wish you success:)
DeleteHi....I'm new to your blog and I'm loving it. One recipe that I had tried is your condensed milk cotton cake. .they are devine. Love it so much. I have a question thou about the natural yeast that you used in the white bread recipe, in that recipe you are using the Natural yeast and commercial yeast ( dry yeast ) together?? Will it work if I omit the dry yeast and used only natural yeast?, is this natural yeast are the one they call sourdough? Thanks in advance and love your blog.
ReplyDeleteHi....I'm new to your blog and I'm loving it. One recipe that I had tried is your condensed milk cotton cake. .they are devine. Love it so much. I have a question thou about the natural yeast that you used in the white bread recipe, in that recipe you are using the Natural yeast and commercial yeast ( dry yeast ) together?? Will it work if I omit the dry yeast and used only natural yeast?, is this natural yeast are the one they call sourdough? Thanks in advance and love your blog.
ReplyDeleteHi Linda, welcome to my blog :) Happy to know you like the condensed milk cotton cake ^^ Yes, you can omit the commercial yeast and use mainly the natural yeast for the white bread. But the proofing time may have to extend to about 2 to 3 times. Commercial yeasts are specially selected yeasts which can "work" faster than the natural yeast we cultivated. Adding both in the bread dough, you get the nice aroma from the natural yeast, and shorten the proofing time from the commercial yeast.
DeleteNatural yeast bread also known as sourdough bread if you keep using the old yeast. To avoid making the bread dough sour, usually we will discard the old yeast, and keep a small portion to cultivate. Fresh yeast poolish dough is less sour than that using the old yeast poolish dough.
Hope I've answered your queries :)
But if omit the commercials yeast, the natural yeast that we use are the same amount right? Just longer proofing time.I have been very interesting in cultivate our own yeast for quite some time and so happy to find it in your blog. I will tried to do it. Wish me luck. For sure will let you know how it goes. Thanks so much for your time and guidance. ..
DeleteBut if omit the commercials yeast, the natural yeast that we use are the same amount right? Just longer proofing time.I have been very interesting in cultivate our own yeast for quite some time and so happy to find it in your blog. I will tried to do it. Wish me luck. For sure will let you know how it goes. Thanks so much for your time and guidance. ..
DeleteHi Linda, if you omit commercial yeast, you may have to increase the quantity of the natural yeast by 3 to 4 times. Sorry I haven't try baking bread in full natural yeast, so can't share much on this :)
DeleteGood luck in your natural yeast cultivation :)
Ohhh...it's okay...your blog are very clear and helpful already. I will let you know for sure when I tried it. Thanks again....
DeleteOhhh...it's okay...your blog are very clear and helpful already. I will let you know for sure when I tried it. Thanks again....
DeleteI love reading your blog and your tutorials. Very clear. Thanks
ReplyDeleteHi Rachel, thank you for liking my presentation. Hopefully, it's helpful to you :)
DeleteI chanced upon your blog and tried out this natural yeast method. I have successfully cultivated the yeast and using it to bake bread and Gula Melaka Huat Kueh without any commercial yeast. The taste of bread and kueh is so good that in the absent of commercial yeast smell. Thank you for sharing generously, i also share my yeast with families and friends. Thank you.
ReplyDeleteHi Cheryll, happy to receive your good feedback. Thank you for taking your time to share your good baking experience with me. Agreed with you, breads and cakes smell better using natural yeast 💕😊
DeleteHi Ngaileng, could I check you mentioned cultivating the natural yeast water, the temperature is to maintain at 27 celcius degrees. How do you maintain the temperature? Thanks in advance��
ReplyDeleteHi Siew Chen, Yes, the natural yeast strives well in cool temperature like 27 degree Celsius. I didn't deliberately keep the yeast at 27 degree Celsius. As I started cultivating the yeast at end of the year, the temperature tends to be cooler. Like these few days, the cooler temperature is very suitable to start cultivating yeast :)
DeleteSo we just keep it at room temperature will do?
DeleteYes, try to keep it at the coolest corner of your house :)
DeleteHi...dear..I finally starting doing it. But still kinda confusing...so on the 1st day after I collecting the grapes water and adding flour in it...I have to wait till about 3 to 4 hour to let it rise rite...so let say after 4 hour it rise more than double...can I use the natural yeast right away or have to wait till 2 or 3 more day???
ReplyDeleteHi Linda, logically speaking, you should be able to use the natural yeast since it is quite active already. However, I just followed others, and let it "train" for a few more days to be extra safe 💕😊
DeleteOhhh...I see...thanks Ngai Leng...I'm in 2nd day on the grapes now...still not sure if it will success...I'm so excited. Oh..anyway I have doubts about the grapes...I kinda washed the grapes really clean...I think I shouldn't do that rite?? I think the white surface that cover the grapes that contains the yeast??? Ohhh...Noooo....
ReplyDeleteHi Carol, i'm new to about natural yeast. Im so happy that i saw your blog! Feel like finally i get someone to help me on my curious.im tried to feed my natural yeast at night, ratio:1(yeast):0.5(flour):0.5(water), it take 4hours raise more than x3 volume. When it slightly started to collapse and i put inside the fridge. Until the next day after work and take partial out make baguette dough. And feed the balance natural yeast. I'm not sure can i do this way?
ReplyDeleteI also feel that if i feed my natural yeast ratio is 1:10(flour):10(water) and my yeast will raise very slow and take about 10hours to raise until max. I'm not sure my theory is it correct. So this morning, i feed my yeast 1:12:12.
Hope my yeast is still working after 12hours. I also have question myself am i feed too much foods and will cause my yeast not *healthy*?
Carol, please correct me if i have done something wrong with my yeast?
Thank You!!
Hi Cathy, after keeping natural yeast for more than one year, I admit I still have lots to learn. I would try my best to share with you my limited knowledge about natural yeast cultivation 😅
DeleteFrom my experience, you can keep the yeast in the fridge about 1 to 2 hours after feeding. Need not have to wait for it to raise to maximum height as you're not using it until the next day. Recently, I started to keep the dough in the fridge for overnight cold fermentation. I would add the natural yeast to the dough about 1 to 2 hours after feeding. After the bread maker completed the kneading, I let the dough rest in room temperature for about 30 to 60 minutes. Then keep the dough in the fridge for about 14 to 18 hours. I can continue to shape the dough the next day. You can browse this recipe for the procedure
http://mymindpatch.blogspot.sg/2017/02/natural-yeast-plain-wholemeal-bread.html
Usually, if the ratio of the yeast to flour and water is great, the fermentation process would take a longer period. For maintenance feeding, I would only feed about 5g each of flour and water to about 40~60g of natural yeast. Unless I would be using it to make bread the next day, then I would feed slightly more. If you feed the natural yeast with lots of flour and water without using it to make bread, the activity level of the natural yeast would reduce. That's why you need to discard part of the old natural yeast after a period of feeding.
To me, feed in small quantity unless you're preparing to make use of them in your bread baking soon.
Hope this sharing helps 😊
So sorry i called you Carol. My bad 😣
ReplyDeleteIt's okay 😊
DeleteHi, just wondering have you try making Rye bread and starter using the natural yeast water?
ReplyDeleteHi, can the grapes be used in anyway as its kind of waste if being thrown away...
ReplyDeleteHi Wendy, yes it is a waste to discard good food. However, I was apprehensive about taking them, as I was not sure what's growing inside the jar of fermented grapes :|
DeleteI too,feel like waste to discard fermented grapes, I taste a pc,have a strong wine taste and blend all to mix into dough and it rise very well,make bread bun,next time I will make artisan bread using discard grape after taste this bread bun,because it look like artisan bread,vey nice when bite into.if fermented grapes taste sour like spoil than thrown away
DeleteHi Honeydew joe, thank you for sharing your great tips on salvaging the fermented grapes :)
DeleteCan the grapes being used for bread baking or something else...
ReplyDeleteHello, I am new to your blog and love the contents! I have just harvested the yeast water today and mixed with same amount of bread flour. However, it did not rise to double as fast as yours, in fact, it was already 4 hours but the volume is less than double. I guess my yeast is not that active yet. In this case, do i take out a small amount of yeast (after the volume is doubled) and feed with same amount of water and flour again? Can I leave it outside (room temperature) and continue feeding tomorrow? To improve the fermentation rate by continuous feeding 2-3 days, does the yeast need to be put in the fridge at night or can it be left outside? Appreciate your advice, thank you!
ReplyDeleteSorry Fiona for my late reply. I hope your natural yeasts are doing well now :)
DeleteHello, thanks for the reply. My first poolish dough was working well. However, when I wanted to do a second bake using the remaining poolish dough stored in the fridge, the yeast failed to grow -- I took out the remaining poolish dough from the fridge and wait till room temp before I feed it, the yeast increased in height very slowly (about 0.6 times after 24 hours), so I continued to feed it (took out 10g natural yeast and added 10g water and bread flour each) once a day to ensure it is active enough before I can use it. It stopped growing at all after the 3rd day. I have tried 2 times to restore the natural yeast but both failed. I am not sure what has gone wrong...Appreciate your advice. Thank you!
DeleteHi Ngai Leng, thanks for your very detailed posts on natural yeast. I had successfully harvested and made a starter with it about 3 weeks ago. For the past 2 weeks, I managed to bake some really soft and fluffy loafs with it, but for some reason, my bakes this week have all failed. The loafs dont rise much even after many hours and had a distinct sour taste. Is it because the starter is weak already? It did rise to 2x volume within 2-3 hours before I start baking. Should I restart cultivating a new batch of yeast water and starter?
ReplyDeleteHi, I have mashed the grapes instead of slicing it. Wld it be any different? Why slicing it instead of mushing it ?
ReplyDeleteHi Elny, I think mashing the grapes may make the yeast water messy as eventually we need to filter out the yeast water. By keeping the fermenting grape water clean, helps in the filtering. But I believe mashing up the grapes should be okay, too 😉
DeleteGreat post. Looking forward to reading more. Thanks for taking the time to write this.
ReplyDeletedisaster recovery services malaysia
cloud backup service
data protection service malaysia